Hello everyone. I hope you're all doing well after all that's being on with Typhoon Ondoy. I haven't had a chance to update, as I lost my Internet service last Saturday and could only use the Internet at work.
Anyway, I'm sure you've read and head a lot about what has happened over the weekend. The greater Manila area, and nearby provinces, experienced the worst rainfall ever last Saturday, about six months worth of water in about six to twelve hours. Many families lost their homes and belongings, some were unfortunate to lose their lives. Those who made it safely to the evacuation centers were all just thankful that they still have their families together.
For those who wish to help, here's three sites that might prove helpful (via MLQ3's Twitter).
List of Places to Donate
Map Update Form (places that still need rescuing, etc)
Ondoy Victim Directory
Also,let's not forget the people in the provinces who were affected by previous storms and were still having trouble recovering. They could also greatly use your help.
Stay safe everyone.
Wednesday, September 30, 2009
Saturday, September 05, 2009
Congratulations all around!
Early this month I received and email from oDesk saying that I made their Top 25 list of Best Freelance Writers for August 2009! I was really surprised because I only had one job and I felt that I didn't put enough hours on it.
Still, it felt really great to read that letter. Congratulations to the other writers as well!
Here's the rest of the best oDesk providers in all categories for August.
Still, it felt really great to read that letter. Congratulations to the other writers as well!
Here's the rest of the best oDesk providers in all categories for August.
Monday, August 24, 2009
NTFS for Mac OS X
The other day, I got myself an external hard drive, Western Digital 320 GB Essential. My search for one was initially based on price, rather than features, mainly because I was assured that most pre-packaged external hard drives are plug & play devices.
I wanted to try out CD-R King's PQI external hard drives, but the branches I went too didn't have it in stock, and it never occurred to me to try inquiring online. I got my hard drive from Octagon at SM Marikina.
The original reason for the drive was so that I could finally get my files off the office computer. I had nearly three years worth of personal stuff there, and burning them on DVDs wasn't enough. I do have an online storage, 100 GB from Humyo, but I didn't feel 100% secure with it. So, external hard drive.
Transferring files from the office PC to the WD Essentials was easy. In less than two hours, I had all my files transferred. When I got home, I plugged the hard drive to my MacBook, started transferring files... and got the error that this file can't be moved to the hard drive because of some permission error.
Huh?
Since I didn't understand what it was, and I didn't have many friends who used OS X, I decided to search for some answers. Thanks to this article from MyFirstMac, I finally got it.
To make the long story short, it all goes back to the file format each operating system uses. Windows makes use of FAT32 or NTFS, while Max OS X uses HFS+, or Mac OS Extended. Mac can handle FAT32, but not NTFS. The result would be is exactly what I had: I can view my files, but I can't put new files into the hard drive.
There are two best ways to go around this. Reformatting the hard drive to FAT32 is not an option for me, as I had already 80 GB of files from my Windows XP machine.
First option was to use a program called NTFS for Mac by Paragon. The reviews of it are very good, so I was eager to try. Downside? Cost. It's US$ 30, probably reasonable, but something I can't afford to shell out.
Second option: use an open source program. My searching suggested using NTFS-3G, a driver that makes use of MacFUSE, a program that allows users to extend the capabilities of Mac OS X to run various third-party applications. Downside? According again to reviews/user feedback, transfer rate (especially if you use USB and not Firewire) is slower than usual. Upside? It's open-source, therefore free. Plus, users of other operating systems such as Linux, FreeBSD, NetBSD, OpenSolaris, etc., can use this to read off NTFS files.
I tried it, and it works great. I can now transfer files from my MacBook to the external hard drive without difficulties. Just check out the links above. Enjoy!
Tuesday, August 04, 2009
Looking for your first oDesk job
So you've taken the oDesk Readiness Test, as well as some other tests that befit your skills. You've filled up your resume and from any person's point of view, it's impressive. You're now ready to look for your first oDesk job. How to do it?
My first job was offered to me, actually. I don't recall applying for it, as the topic was something I wasn't familiar with. The only thing I know about architecture and interior design were the things I read in my mother's books and magazines. My second job was pretty much similar. However, with both jobs, I learned along the way. Sometimes you won't find your "dream job" on oDesk. As a writer, I've yet to come across a job with a topic that I like from the get-go. However, you'll find that even the oddest topics can be quite fun and fulfilling. I feel lucky that the topics of the work I got were ones that I had some interest in, so it was easy to work on.
How to look for oDesk jobs
1. When you log in, you'll find a menu on the very top of the page. Choose "Find providers and jobs." You can either choose to click on it or from the drop-down box, choose "Find jobs."

2. On the next page, you'll see some search options to the left of the screen.
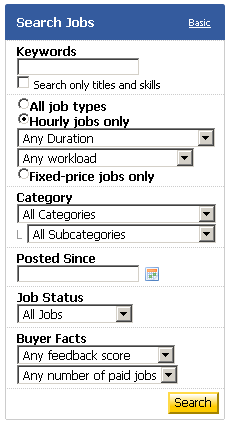
All you have to do is fill it in. You can type keywords of the type of work you're looking for, and choose from the options below. Since I'm a writer, I choose "Writing and Translation" from the category list. I usually leave the sub-category as it is, because sometimes find interesting jobs under other headings.
If you don't want to take the risk of getting "bad job openings," you can adjust the buyer facts. Feedback score would mean what people say about that person offering a job, while "any number of paid jobs" would mean that the company/employer has already had work done by someone and successfully paid them.
The time of the work can also be changed. I often pick hourly jobs, and work that requires ten hours or less because I can squeeze that in my day job hours. It's up to you though, as you know best how much time you can devote to the work.
Is this for me?
After you click on "search," a list of prospective jobs will show up. Browse through them, and click on the title to view the job details, as the list will only be a summary of what it's about. Each job lists when it was posted and when the job is planned to start. They'll also provide you details on what they want done and such. Don't hesitate to ask questions if you need some things clarified. Better to spend a time on that than waste time applying and finding out the job isn't for you after all.
Applying for the job
When you click on "Apply," you will be lead to a page where you need to type a cover letter. I'm not sure how formal a letter this should be, but if you have any doubts, oDesk provides a sample of good vs. bad cover letter. I also kept copies of my previous application letters and adjusted them as needed for the job that I'm applying for. Once, I tried doing an informal letter. I didn't get any feedback from that though, so if you must do the same, proceed with caution.
You can attach files to your letter too. These could be pictures or other documents that show samples of your work, and is often used by those who don't have sites.
Click on box on the terms and agreements, and your application has been submitted. All you have to do now is wait for the employer's reply.
Some notes
From my experience, not every application you send out gets accepted. Sometimes, you're even lucky if you get a reply. Most of the time I learn about the job when I receive a message saying it was either closed, or that I wasn't picked. I don't want to blame the employers on this, especially those that have many applicants (sometimes, the good and easy jobs get at least forty applicants).
Don't be discouraged though. Just because they didn't reply or you didn't get the job, doesn't mean they haven't read your application or looked at your profile. I've seen my profile marked as a favorite by some employers. This means that they like my work and are considering me for future work. That's a positive sign, especially since I've only had two jobs since I started out.
That's it for the basics of looking for jobs at oDesk. Hope that helps.
My first job was offered to me, actually. I don't recall applying for it, as the topic was something I wasn't familiar with. The only thing I know about architecture and interior design were the things I read in my mother's books and magazines. My second job was pretty much similar. However, with both jobs, I learned along the way. Sometimes you won't find your "dream job" on oDesk. As a writer, I've yet to come across a job with a topic that I like from the get-go. However, you'll find that even the oddest topics can be quite fun and fulfilling. I feel lucky that the topics of the work I got were ones that I had some interest in, so it was easy to work on.
How to look for oDesk jobs
1. When you log in, you'll find a menu on the very top of the page. Choose "Find providers and jobs." You can either choose to click on it or from the drop-down box, choose "Find jobs."
2. On the next page, you'll see some search options to the left of the screen.
All you have to do is fill it in. You can type keywords of the type of work you're looking for, and choose from the options below. Since I'm a writer, I choose "Writing and Translation" from the category list. I usually leave the sub-category as it is, because sometimes find interesting jobs under other headings.
If you don't want to take the risk of getting "bad job openings," you can adjust the buyer facts. Feedback score would mean what people say about that person offering a job, while "any number of paid jobs" would mean that the company/employer has already had work done by someone and successfully paid them.
The time of the work can also be changed. I often pick hourly jobs, and work that requires ten hours or less because I can squeeze that in my day job hours. It's up to you though, as you know best how much time you can devote to the work.
Is this for me?
After you click on "search," a list of prospective jobs will show up. Browse through them, and click on the title to view the job details, as the list will only be a summary of what it's about. Each job lists when it was posted and when the job is planned to start. They'll also provide you details on what they want done and such. Don't hesitate to ask questions if you need some things clarified. Better to spend a time on that than waste time applying and finding out the job isn't for you after all.
Applying for the job
When you click on "Apply," you will be lead to a page where you need to type a cover letter. I'm not sure how formal a letter this should be, but if you have any doubts, oDesk provides a sample of good vs. bad cover letter. I also kept copies of my previous application letters and adjusted them as needed for the job that I'm applying for. Once, I tried doing an informal letter. I didn't get any feedback from that though, so if you must do the same, proceed with caution.
You can attach files to your letter too. These could be pictures or other documents that show samples of your work, and is often used by those who don't have sites.
Click on box on the terms and agreements, and your application has been submitted. All you have to do now is wait for the employer's reply.
Some notes
From my experience, not every application you send out gets accepted. Sometimes, you're even lucky if you get a reply. Most of the time I learn about the job when I receive a message saying it was either closed, or that I wasn't picked. I don't want to blame the employers on this, especially those that have many applicants (sometimes, the good and easy jobs get at least forty applicants).
Don't be discouraged though. Just because they didn't reply or you didn't get the job, doesn't mean they haven't read your application or looked at your profile. I've seen my profile marked as a favorite by some employers. This means that they like my work and are considering me for future work. That's a positive sign, especially since I've only had two jobs since I started out.
That's it for the basics of looking for jobs at oDesk. Hope that helps.
Wednesday, July 01, 2009
Tumblr comments with Disqus
Hello readers! This article has been around for years. Tumblr has changed the way they integrate Disqus into their system, so this post needs an update really soon. Thank you for reading!
I joined Tumblr last year after my friend Gilbz showed me his account. It's a blog service that has options that'll allow you to post specific items: music, videos, pictures, quotes, text, links, etc. Tumblr automatically codes it for you and will host most of the files you upload. Music is, however, limited to only one upload a day.
Tumblr has various other features like automatic crossposting to other blog platforms: Blogger, Wordpress, even Posterous. It also has the option where your posts will show up on Twitter. One thing I like about Tumblr is the queue post feature, where you can schedule posts at any time. Possibly the downside of Tumblr (for me) is the Tumblarity, which shows how popular or not you are in the Tumblr world. It goes up and down depending on your activity and how people interact with you. Then again, you can just ignore it. :)
Tumblr, however, lacks a decent comment system. There is something called "Answer," where other Tumblr members can answer a question you post. However, it's limited to only 140 characters and will be available only to those who have Tumblr accounts.
Enter Disqus, a commenting system that can be integrated into any blogging platform. It's a good add-on as it will allow you to monitor all comments to your blogs. Non-Disqus members will also be able to leave replies and you will be informed of any new comments that'll come in.
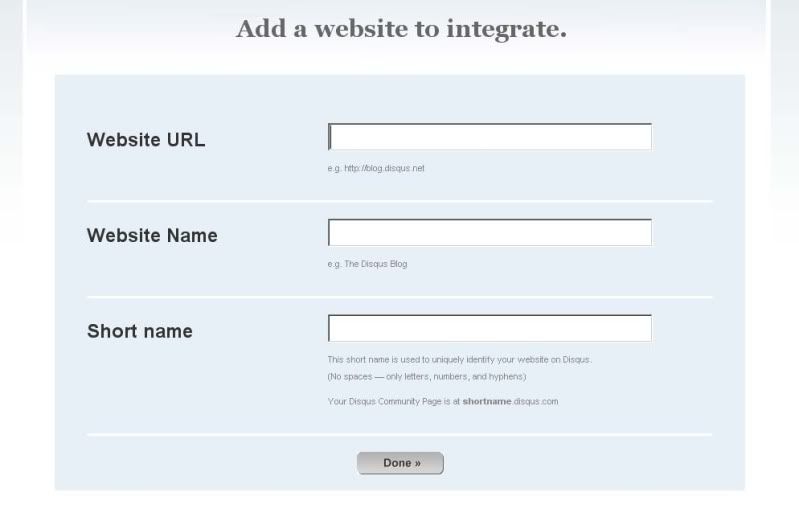
The good news is, Disqus can be used with Tumblr. After signing up for an account, you'll see an option on your dashboard that says "Add a new site." Click that.
You'll get a page like this. Just fill it up with your site's URL and the name.
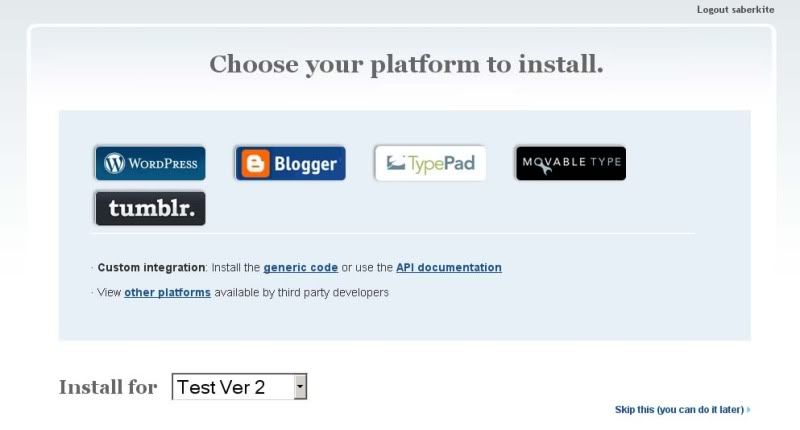
Pick your blog platform. For this tutorial, I picked Wordpress, but if you're adding this to Tumblr, well, you know what to pick.
The next page will give you the code and how you will integrate it to your blog. With Tumblr, you would have to go under the "Theme" then click "Custom HTML." The first code Disqus will give you will be pasted before the {/block:Posts} tags for comment counter and permalink.
The Disqus code for Tumblr will be added somewhere after {/block:Posts}. This will contain the comment box itself. Note differences in the tags.
Once done, you'll be able to receive comments in your Tumblr blog. You can do this for every Tumblr you create.
This is how it looks like after the post

This is how it looks like when you click on it

Subscribe to:
Posts (Atom)