Saturday, December 26, 2009
Season's Greetings!
I'd like to give a huge shout out to all those who hired me to work for them, and to those who expressed their interest in my work. I hope that 2010 will bring more freelance work your way! Cheers!
Monday, November 16, 2009
Alternative to Disqus for your Tumblr
A few months ago, I wrote about adding a commenting feature on your Tumblr using Disqus. Just today, I received a comment on that entry from Lee, letting me know about an alternative to Disqus.
Cmmnt.info is really simple. With only two pieces of code and no sign-up required, it's easy to install it in you Tumblr. There's no other links to distract you (Disqus has a lot of odd links and buttons), and visitors would only need to comment using their name and web address, which are both optional as well.
I've tried it out on my "Salamat Po" Tumblr and it's working great (although I need to figure out how to make the comment link nearer to the actual post than a previous post). I surprisingly got a comment in less than a minute of adding it up.
With its ease of use, it's really a great alternative to Disqus. I'd love to see some added features though, if it's possible, especially something like a tracking system for comments, or the option to receive email when people post a comment in your entries. It would also be great if there was an archive feature.
Give Cmmnt a try!
Update:
I edited the code to place the comment link above the title. IMPORTANT! When you move or edit the code, all comments will be gone!
Wednesday, September 30, 2009
Typhoon Ondoy
Hello everyone. I hope you're all doing well after all that's being on with Typhoon Ondoy. I haven't had a chance to update, as I lost my Internet service last Saturday and could only use the Internet at work.
Anyway, I'm sure you've read and head a lot about what has happened over the weekend. The greater Manila area, and nearby provinces, experienced the worst rainfall ever last Saturday, about six months worth of water in about six to twelve hours. Many families lost their homes and belongings, some were unfortunate to lose their lives. Those who made it safely to the evacuation centers were all just thankful that they still have their families together.
For those who wish to help, here's three sites that might prove helpful (via MLQ3's Twitter).
List of Places to Donate
Map Update Form (places that still need rescuing, etc)
Ondoy Victim Directory
Also,let's not forget the people in the provinces who were affected by previous storms and were still having trouble recovering. They could also greatly use your help.
Stay safe everyone.
Saturday, September 05, 2009
Congratulations all around!
Early this month I received and email from oDesk saying that I made their Top 25 list of Best Freelance Writers for August 2009! I was really surprised because I only had one job and I felt that I didn't put enough hours on it.
Still, it felt really great to read that letter. Congratulations to the other writers as well!
Here's the rest of the best oDesk providers in all categories for August.
Still, it felt really great to read that letter. Congratulations to the other writers as well!
Here's the rest of the best oDesk providers in all categories for August.
Monday, August 24, 2009
NTFS for Mac OS X
The other day, I got myself an external hard drive, Western Digital 320 GB Essential. My search for one was initially based on price, rather than features, mainly because I was assured that most pre-packaged external hard drives are plug & play devices.
I wanted to try out CD-R King's PQI external hard drives, but the branches I went too didn't have it in stock, and it never occurred to me to try inquiring online. I got my hard drive from Octagon at SM Marikina.
The original reason for the drive was so that I could finally get my files off the office computer. I had nearly three years worth of personal stuff there, and burning them on DVDs wasn't enough. I do have an online storage, 100 GB from Humyo, but I didn't feel 100% secure with it. So, external hard drive.
Transferring files from the office PC to the WD Essentials was easy. In less than two hours, I had all my files transferred. When I got home, I plugged the hard drive to my MacBook, started transferring files... and got the error that this file can't be moved to the hard drive because of some permission error.
Huh?
Since I didn't understand what it was, and I didn't have many friends who used OS X, I decided to search for some answers. Thanks to this article from MyFirstMac, I finally got it.
To make the long story short, it all goes back to the file format each operating system uses. Windows makes use of FAT32 or NTFS, while Max OS X uses HFS+, or Mac OS Extended. Mac can handle FAT32, but not NTFS. The result would be is exactly what I had: I can view my files, but I can't put new files into the hard drive.
There are two best ways to go around this. Reformatting the hard drive to FAT32 is not an option for me, as I had already 80 GB of files from my Windows XP machine.
First option was to use a program called NTFS for Mac by Paragon. The reviews of it are very good, so I was eager to try. Downside? Cost. It's US$ 30, probably reasonable, but something I can't afford to shell out.
Second option: use an open source program. My searching suggested using NTFS-3G, a driver that makes use of MacFUSE, a program that allows users to extend the capabilities of Mac OS X to run various third-party applications. Downside? According again to reviews/user feedback, transfer rate (especially if you use USB and not Firewire) is slower than usual. Upside? It's open-source, therefore free. Plus, users of other operating systems such as Linux, FreeBSD, NetBSD, OpenSolaris, etc., can use this to read off NTFS files.
I tried it, and it works great. I can now transfer files from my MacBook to the external hard drive without difficulties. Just check out the links above. Enjoy!
Tuesday, August 04, 2009
Looking for your first oDesk job
So you've taken the oDesk Readiness Test, as well as some other tests that befit your skills. You've filled up your resume and from any person's point of view, it's impressive. You're now ready to look for your first oDesk job. How to do it?
My first job was offered to me, actually. I don't recall applying for it, as the topic was something I wasn't familiar with. The only thing I know about architecture and interior design were the things I read in my mother's books and magazines. My second job was pretty much similar. However, with both jobs, I learned along the way. Sometimes you won't find your "dream job" on oDesk. As a writer, I've yet to come across a job with a topic that I like from the get-go. However, you'll find that even the oddest topics can be quite fun and fulfilling. I feel lucky that the topics of the work I got were ones that I had some interest in, so it was easy to work on.
How to look for oDesk jobs
1. When you log in, you'll find a menu on the very top of the page. Choose "Find providers and jobs." You can either choose to click on it or from the drop-down box, choose "Find jobs."

2. On the next page, you'll see some search options to the left of the screen.
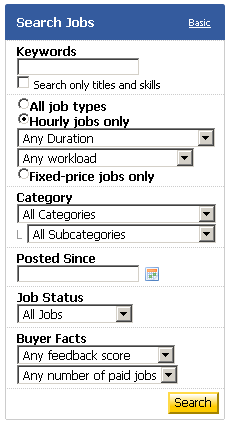
All you have to do is fill it in. You can type keywords of the type of work you're looking for, and choose from the options below. Since I'm a writer, I choose "Writing and Translation" from the category list. I usually leave the sub-category as it is, because sometimes find interesting jobs under other headings.
If you don't want to take the risk of getting "bad job openings," you can adjust the buyer facts. Feedback score would mean what people say about that person offering a job, while "any number of paid jobs" would mean that the company/employer has already had work done by someone and successfully paid them.
The time of the work can also be changed. I often pick hourly jobs, and work that requires ten hours or less because I can squeeze that in my day job hours. It's up to you though, as you know best how much time you can devote to the work.
Is this for me?
After you click on "search," a list of prospective jobs will show up. Browse through them, and click on the title to view the job details, as the list will only be a summary of what it's about. Each job lists when it was posted and when the job is planned to start. They'll also provide you details on what they want done and such. Don't hesitate to ask questions if you need some things clarified. Better to spend a time on that than waste time applying and finding out the job isn't for you after all.
Applying for the job
When you click on "Apply," you will be lead to a page where you need to type a cover letter. I'm not sure how formal a letter this should be, but if you have any doubts, oDesk provides a sample of good vs. bad cover letter. I also kept copies of my previous application letters and adjusted them as needed for the job that I'm applying for. Once, I tried doing an informal letter. I didn't get any feedback from that though, so if you must do the same, proceed with caution.
You can attach files to your letter too. These could be pictures or other documents that show samples of your work, and is often used by those who don't have sites.
Click on box on the terms and agreements, and your application has been submitted. All you have to do now is wait for the employer's reply.
Some notes
From my experience, not every application you send out gets accepted. Sometimes, you're even lucky if you get a reply. Most of the time I learn about the job when I receive a message saying it was either closed, or that I wasn't picked. I don't want to blame the employers on this, especially those that have many applicants (sometimes, the good and easy jobs get at least forty applicants).
Don't be discouraged though. Just because they didn't reply or you didn't get the job, doesn't mean they haven't read your application or looked at your profile. I've seen my profile marked as a favorite by some employers. This means that they like my work and are considering me for future work. That's a positive sign, especially since I've only had two jobs since I started out.
That's it for the basics of looking for jobs at oDesk. Hope that helps.
My first job was offered to me, actually. I don't recall applying for it, as the topic was something I wasn't familiar with. The only thing I know about architecture and interior design were the things I read in my mother's books and magazines. My second job was pretty much similar. However, with both jobs, I learned along the way. Sometimes you won't find your "dream job" on oDesk. As a writer, I've yet to come across a job with a topic that I like from the get-go. However, you'll find that even the oddest topics can be quite fun and fulfilling. I feel lucky that the topics of the work I got were ones that I had some interest in, so it was easy to work on.
How to look for oDesk jobs
1. When you log in, you'll find a menu on the very top of the page. Choose "Find providers and jobs." You can either choose to click on it or from the drop-down box, choose "Find jobs."
2. On the next page, you'll see some search options to the left of the screen.
All you have to do is fill it in. You can type keywords of the type of work you're looking for, and choose from the options below. Since I'm a writer, I choose "Writing and Translation" from the category list. I usually leave the sub-category as it is, because sometimes find interesting jobs under other headings.
If you don't want to take the risk of getting "bad job openings," you can adjust the buyer facts. Feedback score would mean what people say about that person offering a job, while "any number of paid jobs" would mean that the company/employer has already had work done by someone and successfully paid them.
The time of the work can also be changed. I often pick hourly jobs, and work that requires ten hours or less because I can squeeze that in my day job hours. It's up to you though, as you know best how much time you can devote to the work.
Is this for me?
After you click on "search," a list of prospective jobs will show up. Browse through them, and click on the title to view the job details, as the list will only be a summary of what it's about. Each job lists when it was posted and when the job is planned to start. They'll also provide you details on what they want done and such. Don't hesitate to ask questions if you need some things clarified. Better to spend a time on that than waste time applying and finding out the job isn't for you after all.
Applying for the job
When you click on "Apply," you will be lead to a page where you need to type a cover letter. I'm not sure how formal a letter this should be, but if you have any doubts, oDesk provides a sample of good vs. bad cover letter. I also kept copies of my previous application letters and adjusted them as needed for the job that I'm applying for. Once, I tried doing an informal letter. I didn't get any feedback from that though, so if you must do the same, proceed with caution.
You can attach files to your letter too. These could be pictures or other documents that show samples of your work, and is often used by those who don't have sites.
Click on box on the terms and agreements, and your application has been submitted. All you have to do now is wait for the employer's reply.
Some notes
From my experience, not every application you send out gets accepted. Sometimes, you're even lucky if you get a reply. Most of the time I learn about the job when I receive a message saying it was either closed, or that I wasn't picked. I don't want to blame the employers on this, especially those that have many applicants (sometimes, the good and easy jobs get at least forty applicants).
Don't be discouraged though. Just because they didn't reply or you didn't get the job, doesn't mean they haven't read your application or looked at your profile. I've seen my profile marked as a favorite by some employers. This means that they like my work and are considering me for future work. That's a positive sign, especially since I've only had two jobs since I started out.
That's it for the basics of looking for jobs at oDesk. Hope that helps.
Wednesday, July 01, 2009
Tumblr comments with Disqus
Hello readers! This article has been around for years. Tumblr has changed the way they integrate Disqus into their system, so this post needs an update really soon. Thank you for reading!
I joined Tumblr last year after my friend Gilbz showed me his account. It's a blog service that has options that'll allow you to post specific items: music, videos, pictures, quotes, text, links, etc. Tumblr automatically codes it for you and will host most of the files you upload. Music is, however, limited to only one upload a day.
Tumblr has various other features like automatic crossposting to other blog platforms: Blogger, Wordpress, even Posterous. It also has the option where your posts will show up on Twitter. One thing I like about Tumblr is the queue post feature, where you can schedule posts at any time. Possibly the downside of Tumblr (for me) is the Tumblarity, which shows how popular or not you are in the Tumblr world. It goes up and down depending on your activity and how people interact with you. Then again, you can just ignore it. :)
Tumblr, however, lacks a decent comment system. There is something called "Answer," where other Tumblr members can answer a question you post. However, it's limited to only 140 characters and will be available only to those who have Tumblr accounts.
Enter Disqus, a commenting system that can be integrated into any blogging platform. It's a good add-on as it will allow you to monitor all comments to your blogs. Non-Disqus members will also be able to leave replies and you will be informed of any new comments that'll come in.
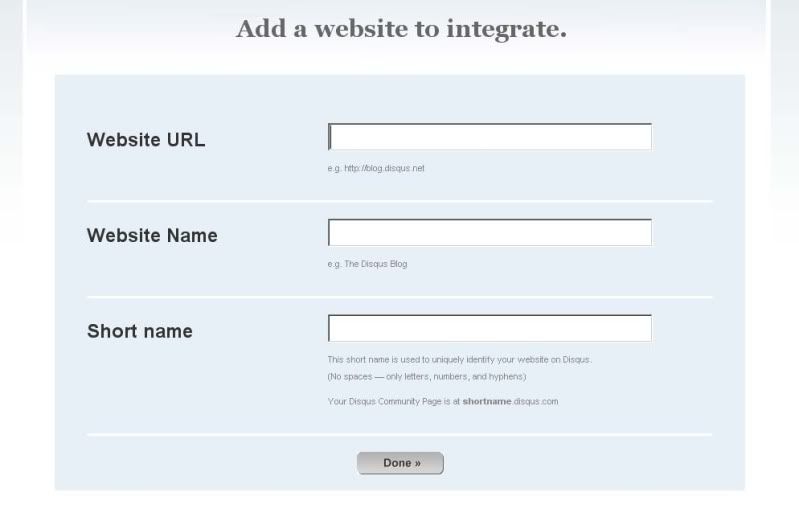
The good news is, Disqus can be used with Tumblr. After signing up for an account, you'll see an option on your dashboard that says "Add a new site." Click that.
You'll get a page like this. Just fill it up with your site's URL and the name.
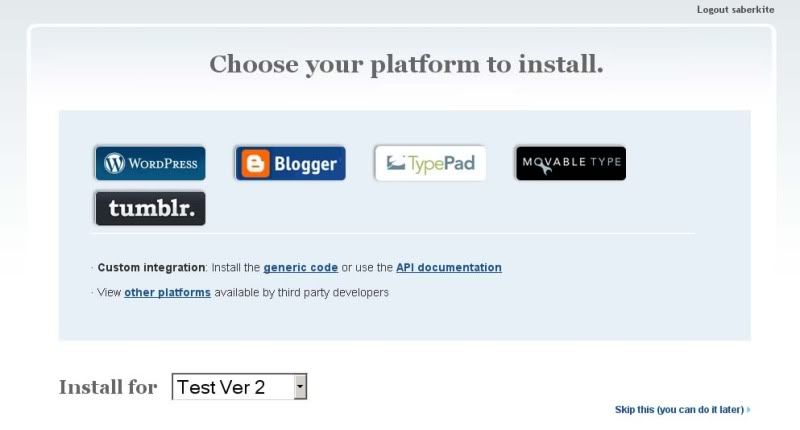
Pick your blog platform. For this tutorial, I picked Wordpress, but if you're adding this to Tumblr, well, you know what to pick.
The next page will give you the code and how you will integrate it to your blog. With Tumblr, you would have to go under the "Theme" then click "Custom HTML." The first code Disqus will give you will be pasted before the {/block:Posts} tags for comment counter and permalink.
The Disqus code for Tumblr will be added somewhere after {/block:Posts}. This will contain the comment box itself. Note differences in the tags.
Once done, you'll be able to receive comments in your Tumblr blog. You can do this for every Tumblr you create.
This is how it looks like after the post

This is how it looks like when you click on it

Saturday, June 20, 2009
Starting on oDesk
I've been seeing a lot of posts in the oDesk forums about newbies having a hard time with the site and its system. I understand that at first it's really daunting, especially since you have to take the oDesk Readiness Test. It wasn't a requirement early last year, but as more and more people join oDesk, it became mandatory. I joined oDesk a week after they implemented it, so I had to take the test.
Here's some simple tips to help you with oDesk.
I've only been on oDesk for a year and had two jobs, but so far I have no complaints. I hope you have a great experience (as well as earn much) as well. Cheers!
Here's some simple tips to help you with oDesk.
- For the oDesk Readiness Test, I decided to play around the site first before I took it. Although the test question provides you a link to either the FAQ or the page where you can find the answer, it's best to be familiar with the site so you don't waste time searching during the test.
- Once you've passed, take other tests that would be relevant to your job. You can even take those that won't. If you fail, hide the test results from public view and retake it.
- Be truthful and realistic about your skills, achievements and accomplishments. Include links to sites, projects or portfolios that you have and are relevant to the job/field you wish to get. Keep them updated. Buyers want to know what they're getting before they commit. If you don't have the right experience and mislead them with your portfolio, they may put that in your feedback and further lower your chances of getting a job.
- Join the oDesk community for your country. It helps, believe me, especially when it comes to the concerns of payment methods, transaction charges and payouts. Plus, the people can give you support if you feel that you aren't doing well in job hunting.
- I stuck with looking for jobs in writing, as that's my forte, but I also started looking for work as an illustrator and web designer. Learn skills that are in demand (which you can find out about in the oDesk Trends) and branch out. Jobs will come your way more.
- Lastly, when you do get your job, devote your time, skills and energy to it as you would in a job you have to go to the office for. Just because it's a virtual job doesn't mean it's less important. Excellent work may net you another job with the client, or a referral.
- Once the job is done, leave a feedback and ask for one in return. If the client declines, thank them and move on. It's up to you if you want to do the same.
I've only been on oDesk for a year and had two jobs, but so far I have no complaints. I hope you have a great experience (as well as earn much) as well. Cheers!
Sunday, June 14, 2009
oDesk Mastercard: Alternative way to get paid
About two months ago, I signed up for oDesk's debit card under Payoneer. Since I've been having problems with Unionbank's EON, I thought it would be advisable to try an alternative. Going through oDesk forums and some blogs show that Payoneer's service is good, stable and fast. The card itself is free, but there are monthly charges as well as transaction charges. Still, as an option to get my money from oDesk, I think it was worth trying out.
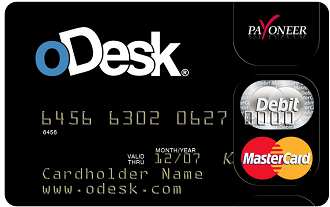
Signing up is easy. oDesk users can do so from the Payments tab of their control panel, then choose Payment options. Non oDesk users can also avail of it through Payoneer's website. Payoneer is a debit card that doesn't need a bank account, and works with Mastercard.
I didn't have much trouble signing up, although my initial application was severely delayed so I had to send an email asking for an update. After that, all I had to do was send a scan of a valid ID. They're rather strict with this and will accept only National IDs. I used my passport and had no trouble with it. In about a month's time, my application was approved and I got my card a few weeks later.
I was able to use my card to verify my Paypal, but to cash out, Payoneer is my main option for now. Here's how it goes:
In oDesk, click "Payments" in your control panel at the top of the screen and choose "Withdrawals". In the next page, choose your withdrawal method from the drop down box. If you have only one option, choose that. Note the charges that will be applied on the withdrawal method you choose.

Once your method is chosen, you will be given an option to choose how much you will take from your account. You can pick their the full amount or specify a smaller one. Note that the withdrawal fee will be deducted from the amount you will withdraw if you choose to take all the money, or from the remaining balance if you don't.
Payoneer's fees are as follows:
US$ 2 - oDesk to Payoneer
US$ 9.95 - Card activation (if you are lucky to get the card with no activation fee, you don't have to worry about this)
US$ 3 - monthly activation fee if the card has balance but no activity for a month
US$ 1- monthly activation fee if the card has balance and has a minimum of two activities for a month (withdrawal or using the debit card for purchases, etc)
Withdrawing funds usually takes about three days, but if you want to get your money immediately, you can pay Payoneer $3 and you'll get the money transferred to your card in about two or (or less). There's also a fee for every withdrawal ($2.15/transaction). I've only tried using BDO ATMs. Balance inquiry is free but when you are withdrawing bigger amounts of money, you get charged a fee. I remember withdrawing P9500 from an account that had P10,000 but when I checked my balance after I was surprised to see that I had only P200 left.
If I am not mistaken, I was charged the $2.15 withdrawal fee and possibly a fee from the bank because I took out more than P5000. I lost nearly P500 for that withdrawal alone, not counting the $3 charged so I could get my money immediately, and the $2 fee for oDesk to Payoneer transfer. It really hurts more when you see it in your local currency.
Payoneer is a great option if you need your money immediately, though in my honest opinion, the charges are quite high and would be a disadvantage if you are earning just enough. However, there are ways where you can minimize your charges, such as looking for a bank that has higher withdrawal limit and getting your money from oDesk to Payoneer at least four days before you need it. Again, Payoneer is a great alternative to Paypal if you don't have one.
For a more in depth discussion about Payoneer use in the Philippines, I turn you over to this thread at the oDesk forums. It's very informative & reading through the replies will get you answers to most questions you might have.
Signing up is easy. oDesk users can do so from the Payments tab of their control panel, then choose Payment options. Non oDesk users can also avail of it through Payoneer's website. Payoneer is a debit card that doesn't need a bank account, and works with Mastercard.
I didn't have much trouble signing up, although my initial application was severely delayed so I had to send an email asking for an update. After that, all I had to do was send a scan of a valid ID. They're rather strict with this and will accept only National IDs. I used my passport and had no trouble with it. In about a month's time, my application was approved and I got my card a few weeks later.
I was able to use my card to verify my Paypal, but to cash out, Payoneer is my main option for now. Here's how it goes:
In oDesk, click "Payments" in your control panel at the top of the screen and choose "Withdrawals". In the next page, choose your withdrawal method from the drop down box. If you have only one option, choose that. Note the charges that will be applied on the withdrawal method you choose.
Once your method is chosen, you will be given an option to choose how much you will take from your account. You can pick their the full amount or specify a smaller one. Note that the withdrawal fee will be deducted from the amount you will withdraw if you choose to take all the money, or from the remaining balance if you don't.
Payoneer's fees are as follows:
US$ 2 - oDesk to Payoneer
US$ 9.95 - Card activation (if you are lucky to get the card with no activation fee, you don't have to worry about this)
US$ 3 - monthly activation fee if the card has balance but no activity for a month
US$ 1- monthly activation fee if the card has balance and has a minimum of two activities for a month (withdrawal or using the debit card for purchases, etc)
Withdrawing funds usually takes about three days, but if you want to get your money immediately, you can pay Payoneer $3 and you'll get the money transferred to your card in about two or (or less). There's also a fee for every withdrawal ($2.15/transaction). I've only tried using BDO ATMs. Balance inquiry is free but when you are withdrawing bigger amounts of money, you get charged a fee. I remember withdrawing P9500 from an account that had P10,000 but when I checked my balance after I was surprised to see that I had only P200 left.
If I am not mistaken, I was charged the $2.15 withdrawal fee and possibly a fee from the bank because I took out more than P5000. I lost nearly P500 for that withdrawal alone, not counting the $3 charged so I could get my money immediately, and the $2 fee for oDesk to Payoneer transfer. It really hurts more when you see it in your local currency.
Payoneer is a great option if you need your money immediately, though in my honest opinion, the charges are quite high and would be a disadvantage if you are earning just enough. However, there are ways where you can minimize your charges, such as looking for a bank that has higher withdrawal limit and getting your money from oDesk to Payoneer at least four days before you need it. Again, Payoneer is a great alternative to Paypal if you don't have one.
For a more in depth discussion about Payoneer use in the Philippines, I turn you over to this thread at the oDesk forums. It's very informative & reading through the replies will get you answers to most questions you might have.
Thursday, April 16, 2009
Testing: MarsEdit 2
A few weeks ago, I joined a contest in MacAppStorm. The price was a license for the Red Sweater blogging software for Mac OSX, MarsEdit. All one has to do was leave a comment on the post or follow the blog on Twitter. Since I already had them on my Twitter, I decided to post a comment.
My DSL was out Tuesday night, so it wasn't until I went to work the next day did I see the results. I wasn't really expecting anything, so I didn't read the entry immediately, checking out my other feeds first. To my surprise, I actually won the contest.
I'm testing it out right now. Installation... there wasn't any. After extracting the file and dragging it to my applications folder, that was it. Open it and I was ready to go.
I added my four blogs including this one, and am using/used MarsEdit to write this post. It's rather nice to see all my tags/categories listed on the side of the post pane. My usual problem with tags is I forget which ones I have and sometimes I end up making new ones.
I like how the main window works like an email client, or iMail. I see my blogs on a list on one side, then the twenty most recent posts, and if I click on those, I get a preview at the bottom pane. Nice. I don't have to browse through my blog's pages to find a post or so about this or that. I can do a search here.
Biggest plus? It frees up space on my browser, and I don't have to worry about losing my entry should in any case the server or the Internet connection fails while I'm publishing.
So far, in this very brief use of MarsEdit, I find it very convenient. I'm looking forward to using it more in the future.
Many thanks to the folks of MacAppStorm and MarsEdit for this software. I consider it as an excellent birthday gift!
Thursday, April 02, 2009
MacHeist 3 Bundle: 5 days to go!
I'm sure most Mac users have heard of MacHeist. The site where you can solve puzzles and get free Mac applications that would normally set you back a couple of dollars. Given that many of these apps are truly useful and cost more than what I'm willing to shell out, taking time to try and solve these puzzles is worth it.
MacHeist 3 is the latest of the series of puzzles. Solving all mini heists would give you many apps such as Fresh, Shovebox, Process, Overflow and EventBox, to name a few. What's more, certain puzzle give you discounts on the bundle that MacHeist will (or in this case, already is) selling at the end of each Heist.
 So what is this MacHeist bundle? Well, think of it as several top Mac apps, most of which will cost more than $10 each. We're talking about screenshot apps (Little Snapper), audio editing and recording tools (WireTap Studio), photo editing tools (Picturesque, Acorn), recipe tools (SousChef), 3D animation software (Kinemac), even a few games.
Some of these apps don't come cheap. Kinemac alone is worth $299, while WireTap Studio is $69. Two apps and that's already $368! I definitely won't spend that much for these apps. But toss this into the bundle, along with other great apps for only $39 (less if you got the discounts during the mini heists)? I'd say that's more than worth the price.
If you purchase the bundle, a part of it will go to charity, and for every certain amount sold, a new app is unlocked. WireTap Studio was unlocked when the $300,000 goal was reached, and BoinxTV is next when the money raised for charity reaches $400,000. The last app to be unlocked would be Espresso, which retails for $80. With only five days left, there's still alot to go before the next app is unlocked. I'm hoping all apps get unlocked, because one: think of all that money donated to charity and two: the apps. Sweet deal.
You can check out the apps in the bundle at MacHeist. Get yours and make you Mac and yourself happier with all the nifty tools.
Friday, March 13, 2009
Wrong word, right use (or vice versa)
One of the biggest mistakes a writer nowadays can commit is relying too much on their word processor's spell check feature.
Don't get me wrong. I use the spell checker myself and find it a very good tool in helping me easily spot mistakes in spelling and even grammar usage. However, you shouldn't be too confident that it will spot all your mistakes and provide you with the correct word to use when you need it. A spell checker has it's limits, and because of these limits you may end up with a badly written piece than a well made one.

Photo courtesy of: Stock Exchange
It only checks wrong spelling
Obviously, as it is a spell checker. A word that doesn't match any word in the word processor's data base will be marked wrong, even though you know it exists and your dictionary says so.
It will not correct wrong word usage if the word is spelled right
Many writers, even those who are native English speakers, often switch words that sound the same but are not spelled the same. Here are some examples:
Lose - Loose
Bare - Bear
Hare - Hair
Hale - Hale
Hart - Heart
Fair - Fare
Write - Right
Site - Sight
Sore - Soar
Take this sentence. "With this diet, I'm sure to lose a few pounds so my clothes will all be loose."
Both words of different spelling are used here, and it's clear what each word means. Switch them and the reader still knows what you mean, but if a professional is looking at your work and you are looking for a job (a writing one at that), you might lose points for that mistake.
It is specific only to one kind of English at a time
My spell checker is set to American English. If I decide to spell my words the British way --- with the additional 'u' in some words, or 's' instead of 'z', I'm sure to get an error.
In relation to that, if I use words that are not common in the American English vocabulary, it will be marked wrong.
It won't help much if you write in another language
I experience this a lot, especially if I'm writing or editing Tagalog text. You'll never see so many red squiggly lines under so many words in just one document page! It's worse when the word processor automatically corrects the words. "Undo" is my best friend. Either that, or I turn off the spell checker.
Grammar is checked, but sometimes, it's also wrong
Grammar mistakes are denoted with green squiggly lines. Do a right click over them and you're likely to see something that says "Fragment" and a suggestion on what would make your sentence sound better. I suggest you read it aloud to see if it will work. Better yet, read the whole paragraph aloud to see if the suggested changes would be appropriate, because sometimes, it really isn't.
I'm not saying you do away with the spell checker completely. Many times I just ignore the suggestions, as the marks don't really disturb anyone but me. Then again, I do make mistakes and the spell checker does help easily spot errors with misspelled words.
However, learn to judge when its suggestions are right or wrong. Sometimes the spell checker is a pompous know-it-all that marks things wrong when they aren't. If in doubt, consult a dictionary, and when you're done writing, read it over twice, then ask someone to read it over twice as well. A fresh set of eyes may spot mistakes that you may have missed. Even the most famous authors make a mistake when they write, and it's their editor's job to help them correct them.
Happy writing!
P.S. I didn't encounter any red lines while typing this, but that doesn't mean it doesn't have errors! If you spot any, let me know. :)
Don't get me wrong. I use the spell checker myself and find it a very good tool in helping me easily spot mistakes in spelling and even grammar usage. However, you shouldn't be too confident that it will spot all your mistakes and provide you with the correct word to use when you need it. A spell checker has it's limits, and because of these limits you may end up with a badly written piece than a well made one.
Photo courtesy of: Stock Exchange
It only checks wrong spelling
Obviously, as it is a spell checker. A word that doesn't match any word in the word processor's data base will be marked wrong, even though you know it exists and your dictionary says so.
It will not correct wrong word usage if the word is spelled right
Many writers, even those who are native English speakers, often switch words that sound the same but are not spelled the same. Here are some examples:
Lose - Loose
Bare - Bear
Hare - Hair
Hale - Hale
Hart - Heart
Fair - Fare
Write - Right
Site - Sight
Sore - Soar
Take this sentence. "With this diet, I'm sure to lose a few pounds so my clothes will all be loose."
Both words of different spelling are used here, and it's clear what each word means. Switch them and the reader still knows what you mean, but if a professional is looking at your work and you are looking for a job (a writing one at that), you might lose points for that mistake.
It is specific only to one kind of English at a time
My spell checker is set to American English. If I decide to spell my words the British way --- with the additional 'u' in some words, or 's' instead of 'z', I'm sure to get an error.
In relation to that, if I use words that are not common in the American English vocabulary, it will be marked wrong.
It won't help much if you write in another language
I experience this a lot, especially if I'm writing or editing Tagalog text. You'll never see so many red squiggly lines under so many words in just one document page! It's worse when the word processor automatically corrects the words. "Undo" is my best friend. Either that, or I turn off the spell checker.
Grammar is checked, but sometimes, it's also wrong
Grammar mistakes are denoted with green squiggly lines. Do a right click over them and you're likely to see something that says "Fragment" and a suggestion on what would make your sentence sound better. I suggest you read it aloud to see if it will work. Better yet, read the whole paragraph aloud to see if the suggested changes would be appropriate, because sometimes, it really isn't.
I'm not saying you do away with the spell checker completely. Many times I just ignore the suggestions, as the marks don't really disturb anyone but me. Then again, I do make mistakes and the spell checker does help easily spot errors with misspelled words.
However, learn to judge when its suggestions are right or wrong. Sometimes the spell checker is a pompous know-it-all that marks things wrong when they aren't. If in doubt, consult a dictionary, and when you're done writing, read it over twice, then ask someone to read it over twice as well. A fresh set of eyes may spot mistakes that you may have missed. Even the most famous authors make a mistake when they write, and it's their editor's job to help them correct them.
Happy writing!
P.S. I didn't encounter any red lines while typing this, but that doesn't mean it doesn't have errors! If you spot any, let me know. :)
Thursday, February 26, 2009
Working on the new Safari
If you haven't updated yet, check out Safari Beta 4, available now for download at the Apple website.
I installed it last night and I must say it's performing really great. The sites are loading much faster than they do in my Firefox. I love the Top Sites, which is somewhat the default "homepage" when you load Safari or open a new tab. It's like Cover Flow for your browser, and it looks so sleek and smooth. As you browse, Safari will note the sites you most often visit and put in on your top sites. You can edit it and pin the sites you most visit so that Safari won't change it.
I've yet to see the other changes Safari has for this release, but so far I'm loving it.
OSX Leopard users would have to update their system to 10.5.6 as well as to the new Security update. Took me a few minutes to run all that before I could install Safari.
Saturday, February 14, 2009
Tech updates
I recently updated my Yahoo Messenger on my MacBook. It's now Version 3.0 Beta 4 (156957).
Changes? Well, I changed my font color, and noticed that when I opened a new chat window, the colors are automatically on. Today, when I signed in, the colors are still there so that's definitely a good change!
However, my avatar's gone when I signed in. Even when I tried to change it, it's still blank.
DSL
My DSL is up and running fine now, thanks to my brother's insistence in having a technician come over to get it fixed. I hope this will stick, because I'm really sick of dealing with a very bad quality service.
Saturday, February 07, 2009
Ready to go!
In the past year, Drew and I have discussed the possibility of creating our own podcast. It took a while for us to even try to go on Skype for a test call, to the point that we managed to drag several of our friends to join in the fun. We found that we could all carry a decent and clear conversation, it's the recording part that's another story.
I've been unofficially given the job of being the technician, in charge of recording and cleaning up the files before sharing it with the world. So far, I had been unsuccessful in finding methods in recording the calls clearly and cheaply (read: free).
My searches choked up tons of software on Windows, both free and not. With Mac, it was a bit more tough, but there were workarounds. Often it involved using more than one software, which was daunting at first.
The first how-to that I found was courtesy of The Clever Sheep. I downloaded the required apps, configured them the same way and tried calling my sister (who was sitting across from me that time). It worked, or so I thought. When I tried recording a call with Drew, it didn't work... and I couldn't make it work.
I did a few more searches, most of which required me to buy a software. One offered using Garage Band with Line-In and Soundflower, but I don't know how to use GB, so that failed as well.
Finally, last night, I stumbled across a page from Make magazine (Issue 2, published by O'Reily) on how to make your own podcast. Their list of software were what I already have, which was great. I copied the instructions to my index card pad, configured the settings for each program, called Drew and... it worked.
I still don't get how it works, technically, but since it does, I don't even bother to try figure it out so long as it keeps working. I am just surprised that I can actually hear myself through my headset, whereas normally, when I talk I just hear the other person. The effect of this set-up is much like that of an actual radio recording, where you can hear yourself as the audience (will) hear you, allowing you to moderate your voice if needed.
Here are my settings:
Skype

Line In

Don't forget to click "Pass Thru". This is the feature that will allow you to hear your own voice from your headset, and will make the mic seem extra-sensitive in picking up sound.
Audacity

For Soundflower, choose "Built-in Output" for the channel you are using. I left the sound preferences of my Mac on default (and besides, I couldn't seem to change it).
According to the guide, if it doesn't work, change the channel to 16ch instead of 2ch. Also, you may want to vary the order of programs you open. Lastly, try another recording program.
So far, this set-up works when I call Echo123 (Skype's test service) and that one call with my friend Drew. Hopefully, it'll continue to work.

I've been unofficially given the job of being the technician, in charge of recording and cleaning up the files before sharing it with the world. So far, I had been unsuccessful in finding methods in recording the calls clearly and cheaply (read: free).
My searches choked up tons of software on Windows, both free and not. With Mac, it was a bit more tough, but there were workarounds. Often it involved using more than one software, which was daunting at first.
The first how-to that I found was courtesy of The Clever Sheep. I downloaded the required apps, configured them the same way and tried calling my sister (who was sitting across from me that time). It worked, or so I thought. When I tried recording a call with Drew, it didn't work... and I couldn't make it work.
I did a few more searches, most of which required me to buy a software. One offered using Garage Band with Line-In and Soundflower, but I don't know how to use GB, so that failed as well.
Finally, last night, I stumbled across a page from Make magazine (Issue 2, published by O'Reily) on how to make your own podcast. Their list of software were what I already have, which was great. I copied the instructions to my index card pad, configured the settings for each program, called Drew and... it worked.
I still don't get how it works, technically, but since it does, I don't even bother to try figure it out so long as it keeps working. I am just surprised that I can actually hear myself through my headset, whereas normally, when I talk I just hear the other person. The effect of this set-up is much like that of an actual radio recording, where you can hear yourself as the audience (will) hear you, allowing you to moderate your voice if needed.
Here are my settings:
Skype
Line In
Don't forget to click "Pass Thru". This is the feature that will allow you to hear your own voice from your headset, and will make the mic seem extra-sensitive in picking up sound.
Audacity
For Soundflower, choose "Built-in Output" for the channel you are using. I left the sound preferences of my Mac on default (and besides, I couldn't seem to change it).
According to the guide, if it doesn't work, change the channel to 16ch instead of 2ch. Also, you may want to vary the order of programs you open. Lastly, try another recording program.
So far, this set-up works when I call Echo123 (Skype's test service) and that one call with my friend Drew. Hopefully, it'll continue to work.
Thursday, January 29, 2009
Paper vs. Electronic books
Lev Grossman of Time Magazine writes about "Books Gone Wild: The Digital Age Reshapes Literature"
My weekly book meme, Booking Through Thursday, is discussing this topic on the blog itself rather than asking participants to post their discussions in their blogs. Mine's a bit lengthy, but it's fun.
What's your take on the status of the publishing industry?
Here's a literary parable for the 21st century. Lisa Genova, 38, was a health-care-industry consultant in Belmont, Mass., who wanted to be a novelist, but she couldn't get her book published for love or money. She had a Ph.D. in neuroscience from Harvard, but she couldn't get an agent. "I did what you're supposed to do," she says. "I queried literary agents. I went to writers' conferences and tried to network. I e-mailed editors. Nobody wanted it." So Genova paid $450 to a company called iUniverse and published her book, Still Alice, herself.
That was in 2007. By 2008 people were reading Still Alice. Not a lot of people, but a few, and those few were liking it. Genova wound up getting an agent after all--and an offer from Simon & Schuster of just over half a million dollars. Borders and Target chose it for their book clubs. Barnes & Noble made it a Discover pick. On Jan. 25, Still Alice will make its debut on the New York Times best-seller list at No. 5. "So this is extreme to extreme, right?" Genova says. "This time last year, I was selling the book out of the trunk of my car.
Continue reading
My weekly book meme, Booking Through Thursday, is discussing this topic on the blog itself rather than asking participants to post their discussions in their blogs. Mine's a bit lengthy, but it's fun.
What's your take on the status of the publishing industry?
Subscribe to:
Posts (Atom)